MITM Router
Raising Awareness of the Hidden Cost of Technology
- Connect your personal device to the wifi MITM
- Go to a website
- Observe your internet becomes very slow
- The slider is a representation of your data traveling to the server and back to you
- After each travel of the slider, a small part of your webpage loads incrementally
- Everytime part of your webpage loads, the labour meter goes up.
- Your can expedite the data by using your own labour to move the slider to the server and back. Each time you move the slider to the server and back a part of your webpage loads
- Alternatively, your can rotate the dial to permanently increase the speed of your internet at the cost of a louder fan noise.

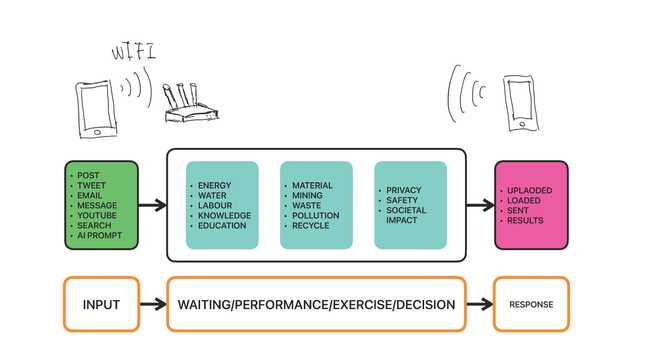
This work took inspiration from Kate Crawford's Anatomy of AI system and Thijs Biersteker's MB > CO2. I wanted to present the hidden cost of technology to people in a tangible and interactive way in order to confront people with the question "do we really need so many technology advancement?"
Product Design
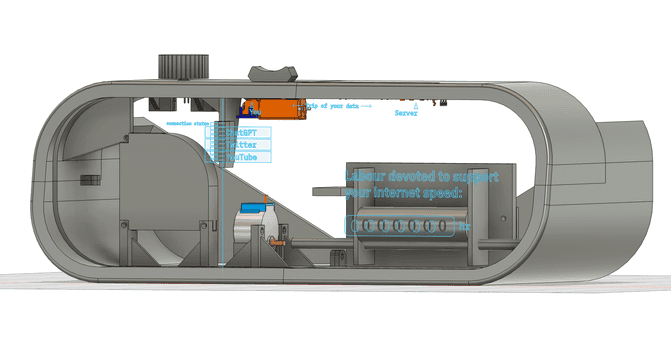
Due to the interactive nature of the device, it has to be mechanically reliable to withstand constant interaction from users in a museum or exibition setting. I modeled every component thoroughly to ensure that the 3D printed chasis provide a stable structure to support extensive user interactions.
Several complex mechanisms are required to enable the various tangible user interactions of the device. For example, the live labour hour meter requires a stepper motors to accurately rotate the meter to a specific number. I made a custom shaft coupling (the silver bar in the middle of the video) to connect the stepper motor and the meter to ensure the mechanism is reliable.
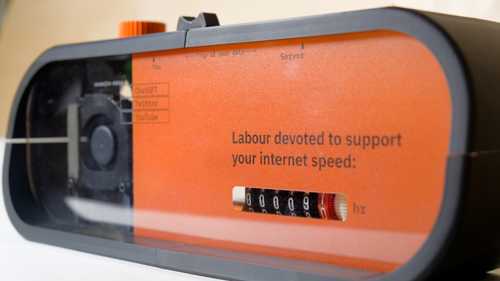
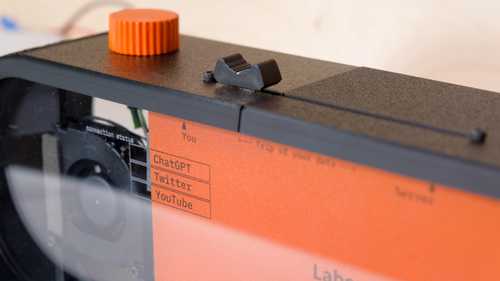
I wanted to exploit people's familiarity with the internet to surprise them when they see their internet data delayed and represented by this physical device. Hence the design language employed here meant to make the device easily blend into people's daily, domestic settings. Inspirations were also taken from some retro tech devices in order to remind people that modern technology still runs on old school resources and labour.
System Architecture
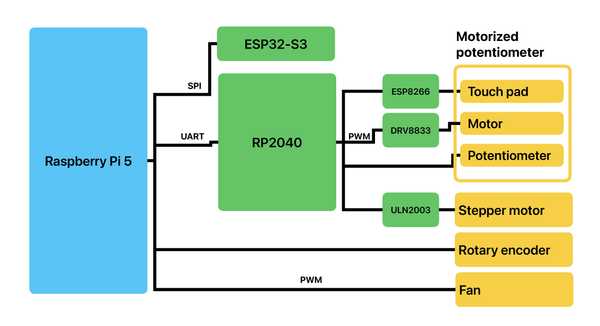
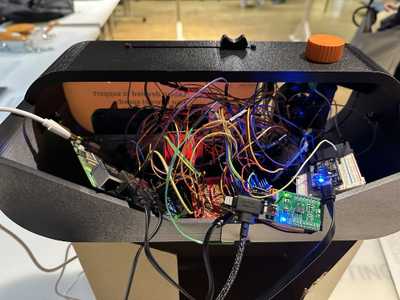
Due to the number of input/output device involved and the computation required to run a router with proxy server, several microcontrollers were used in addition to the Raspberry Pi 5 to perform the following function:
- An ESP32-S3 was used to act as a secondary wifi chip for the Raspberry Pi 5
- An RP2040 was used to control the motorized potentiometer and the stepper motor
- An ESP8266 was used to detect the touch pad on the slider
- The Raspberry Pi runs the wifi hotspot.
- A mitmproxy proxy server hosted on the Raspberry Pi intercept http/https packets going through the device and send command to the RP2040 to control the input/output interfaces.
- ESP32-S3 is programmed with the esp-hosted firmware to act as a secondary wifi chip of the Raspberry Pi.
The power supply schema in the device is complicated by the different voltage and current requirement of various components, for example the motorized potentiometer operates at 12v for its motor but the potetiometer has to be operated at logic voltage level of the RP2040 microcontroller. I ended up using a STUSB4500 USB-PD controller to regulate power from a USB-PD wall adapter.
Learn more
Work In Progess: Haptic Belt
Using Haptic Feedback to Provide Navigation for Visually impaired People

The main challenge is the mounting of the vibration motors on the flexible PCB. Becuase the vibration motor is a constantly moving component, soldering the motor on the flexible pcb by any means will likely fail very quickly. My solution to this is to use a spring loaded contact connector to connect the motor to the PCB. However, the contact point between the motor and the spring contact will need to be held at a constant distance to maintain contact. So I designed a custom bracket to hold the motor and maintain its vertical distance to the board. I also designed the flexible PCB to be a rigid-flex PCB, meaning that there are four rigid sections within the flexible PCB that can support the stress of the motor contact point.
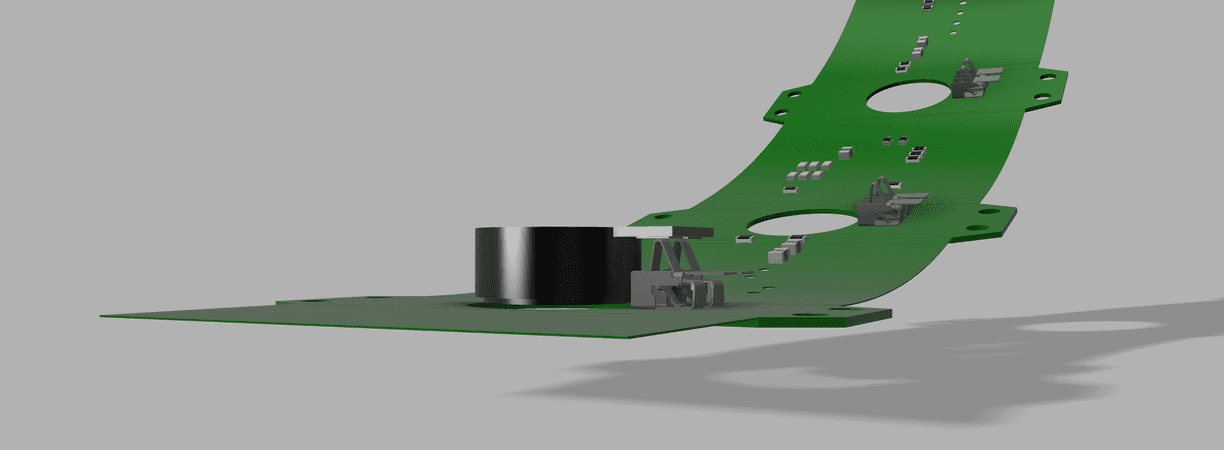
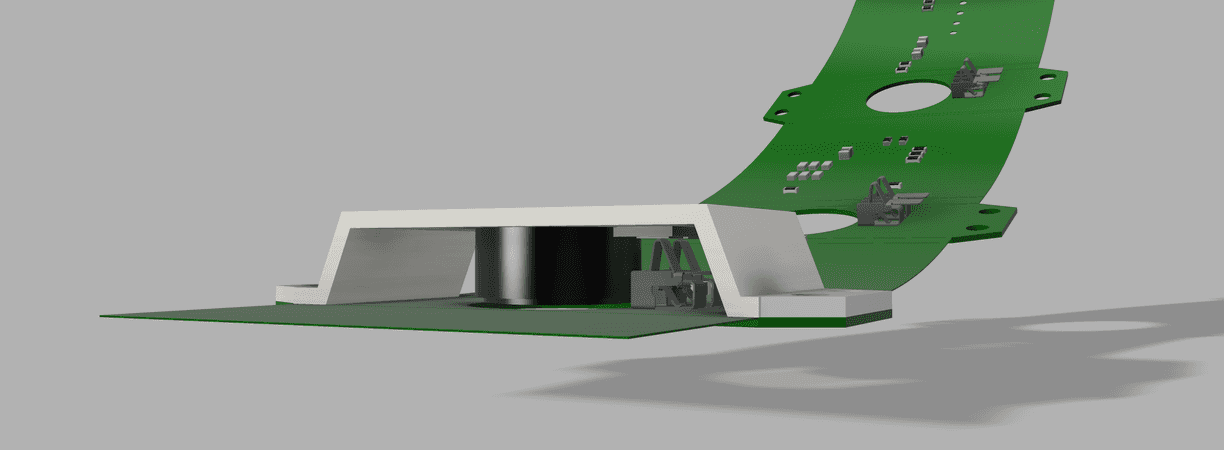
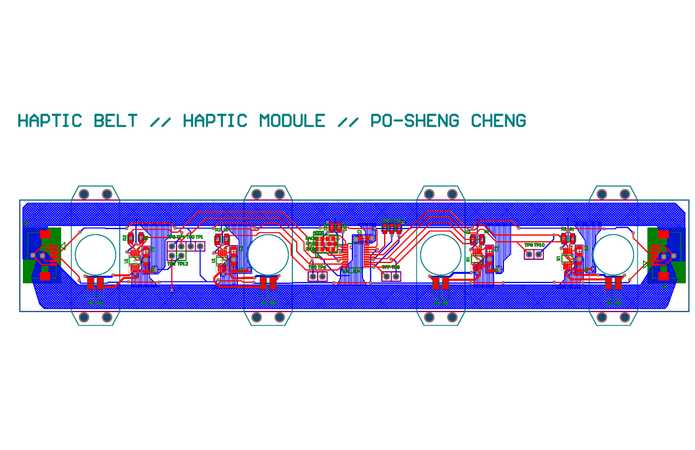
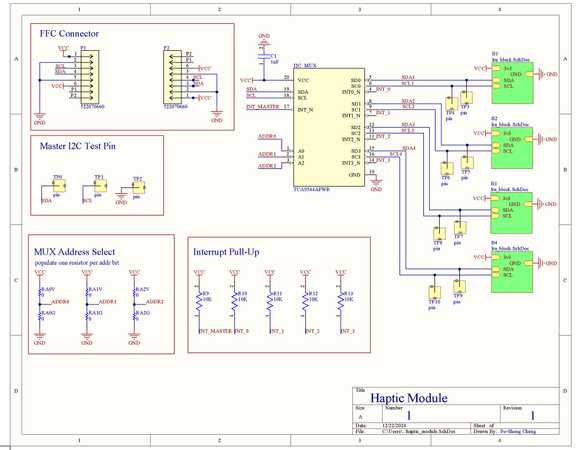
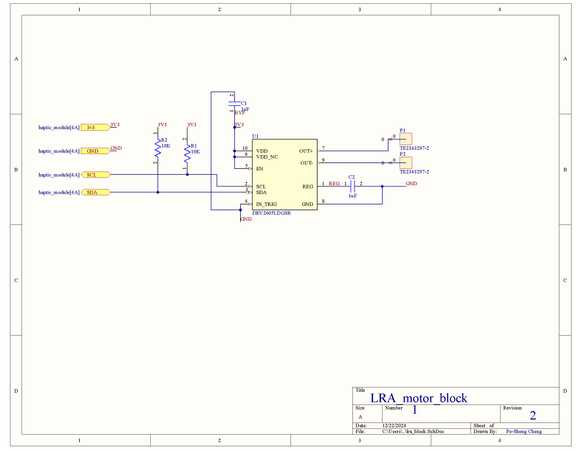
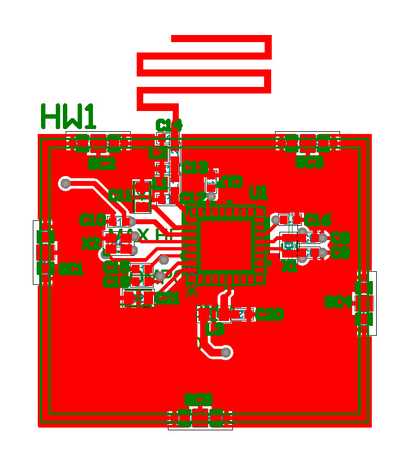
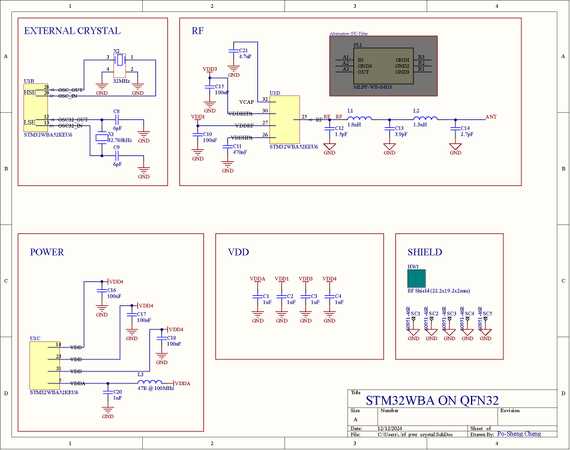
This is a work-in-progess project
More infomration can be found in the following link.
Nexus
Intelligent Lost Item Recognition and Management Platform
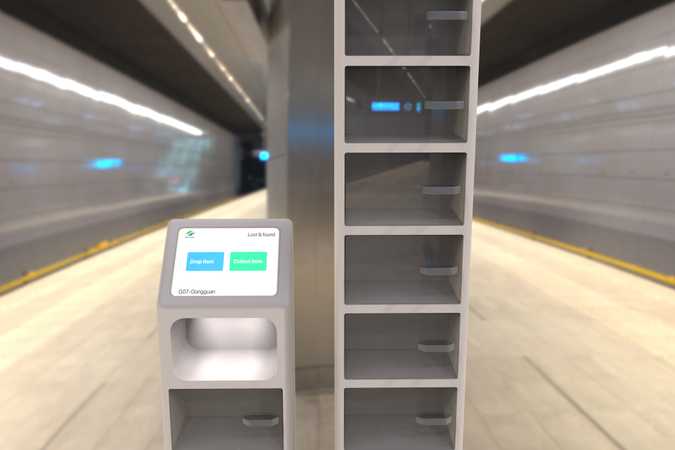
The main compenent of Nexus is its modular kiosk that can be easily deployed to a wide range of public facilities. The kiosk is equipped with a human interface and a camera in the item scanning chamber to recognize and automatically log the item to our database as well as an expandable storage system.
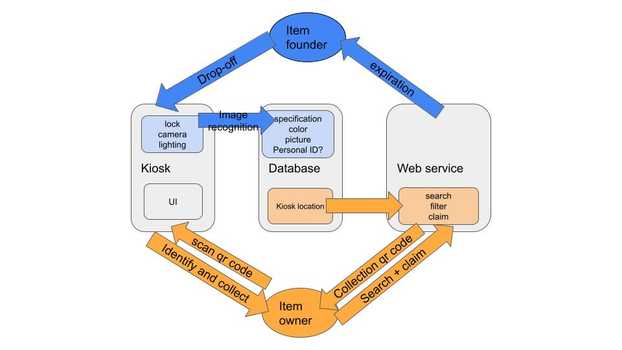
This graph documented how users will interact with each component of the Nexus platform. Since Nexus is a platform consisting of several products, this was an important piece of document that laid out how every part of the platform works together to solve different user's problems.
System Architecture
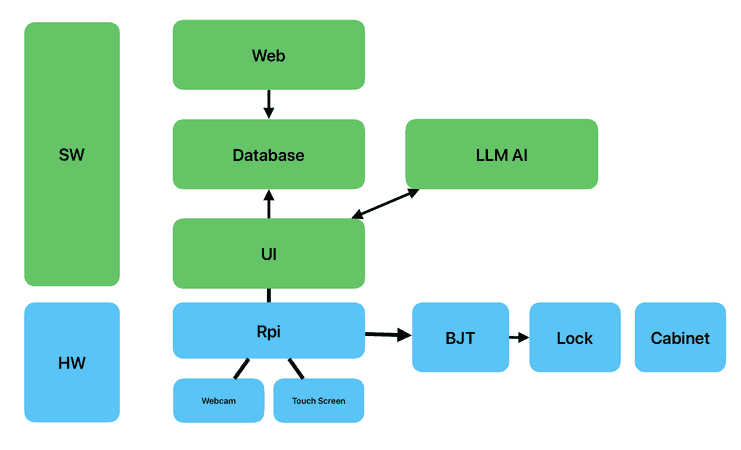
As the system architect of the project, I laid out the system block diagram for the platform. This is the final version in which Raspberry Pi was chosen as the main hardware platform.
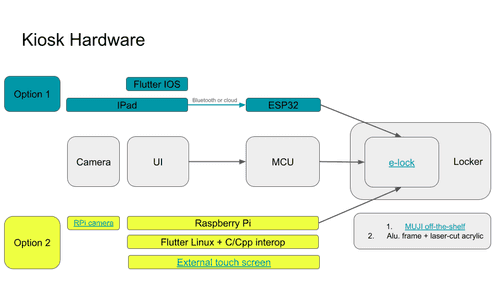
I also laid out the Engineering Validation Test plan for the kiosk hardware. I built several prototypes using different hardware architectures shown here to finalize our engineering parameters and options. The following section shows the prototypes I built during the process.
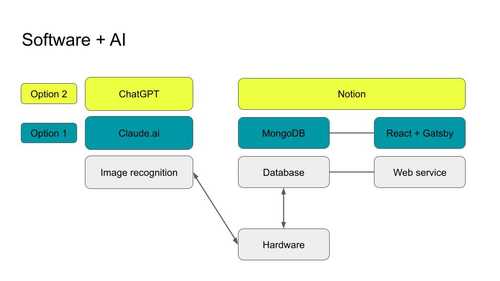
Similarily, I also made the EVT plan for our software platform, outlining different options for developing the software services.
Hardware Prototyping
The various stages of prototyping was crucial in turning the direction of the project from a single product to a platform that integrtes several products. The prototypes I developed helped showcase the feasibility and the benefit of having the hardware, software and services all working seamlessly.
This first generation prototype use an iPad app to test the feasibility and options of the two biggest technical uncertainties:
- Object Recognition: I tested using genAI APIs to recognize items stored in the kiosk.
- Control Circuit: In order for my iPad prototype app to be able to control the circuit for the locking mechanism on the kiosk, I used an ESP32 microcontroller that is connected to iPad via BLE wirelessly to control the circuit.
This video shows the app controlling a pin on the microprocessor that is connected to the multimeter.
As the first gen prototype proved it's very feasible to use a genAI API to perform object recognition, the next step for me is then to try migrating the application to a Raspberry Pi. The benefits of using Raspberry Pi compared to an iPad are:
- A Raspberry Pi combined with a touch screen is half the price of an iPad.
- Raspberry Pi provides the pinout that can be used to control the circuit of the locking mechanism.
This video also shows that the application on Raspberry Pi is capable of uploading the object recognition result to our Nexus database.
This video shows the application of Gen 2 prototype integrated with the control circuit tested by a multimeter.
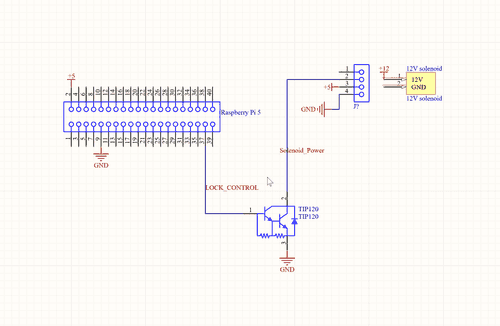
Besides the electronics part of the hardware, I also designed the concept hardware of the kiosk and the mechanical design of an early candidate for our build plan.
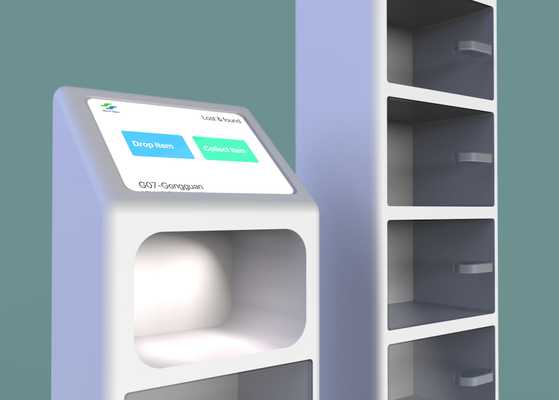
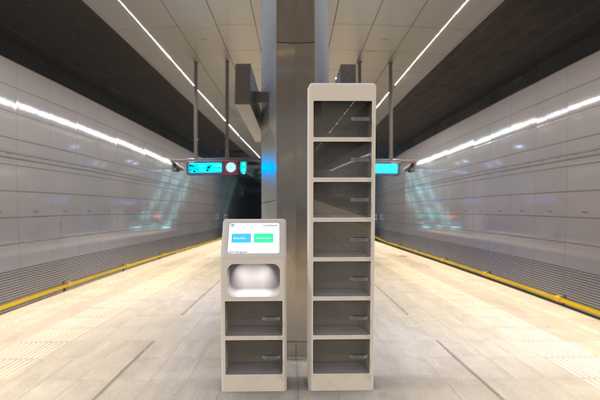

This is a CAD model designed in Fusion that incorporates an iPad as the main device and use aluminum frame as the main structure.
UI Prototyping
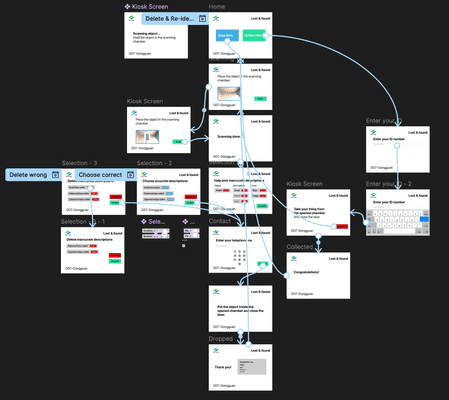
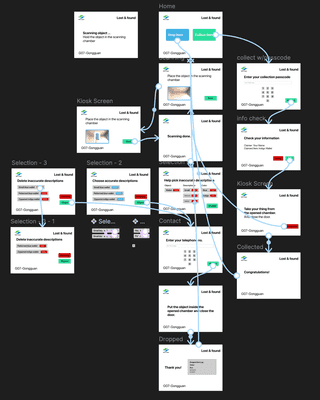
I performed extensive evaluations on the operation flow of all the user interfaces across different product in the platform. For example, I created several different flow for validating identification on the kiosk and also various ways to modify the result of object recognition. Then, user tesing was conducted to decide the final flow.
These are two of the candidates for different operation flow for authenticating owner of lost items. We decided to choose the passcode flow (on the left).

Learn more
This project was funded by Google. I am grateful to have a wonderful team working on other aspects of the project. Heather Hsieh implemented the Nexus website, ChunKai Hsu helped fine tune the prompt for Google Gemini LLM, they also shot and edited the main demo video. Alan Chen helped building the final prototype hardware and YuJie Huang helped implemented the database in Notion.
Pest Machine
An IoT machine designed to monitor the amount of bugs in farm fields.
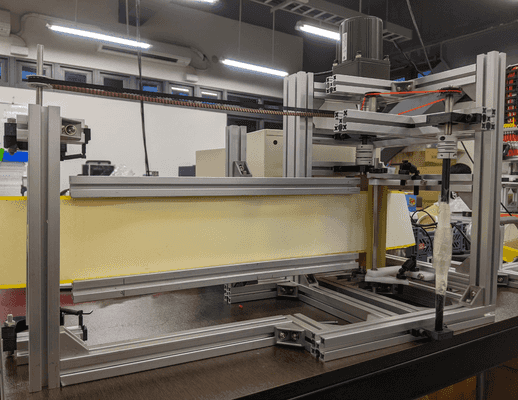
Historically it's very hard to constantly monitor the amount of flying bugs in outdoor farm fields.This design aims to provide solution while being consistent, weather-proof and connected to existing farm field monitoring IoT grid.
Iterating the working principle
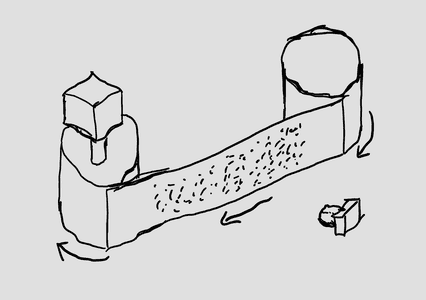
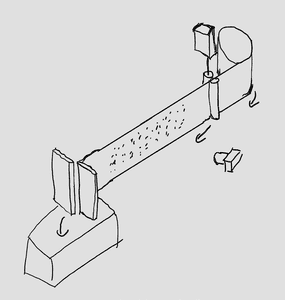
The original concept uses a simpler structure, but has problems for stability and consistency of rotational movements.
The modified design addresses the stability and consistency problem by driving the roll of adhesive paper indirectly.
More iterations were made, including:
- A knife cutter at the end.
- An anchor in the end and guide added.
- Another roller added.
Engineering
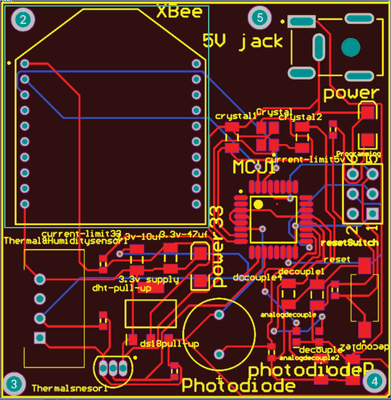
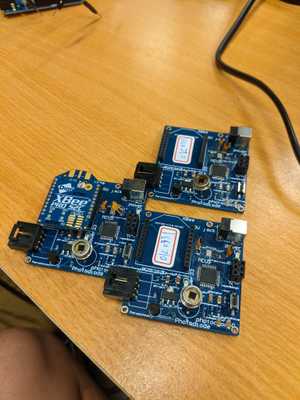
Custom Controller and IoT Board
I designed a custom PCB that acts as the central controller of the machine. It monitors the environment with various sensors like temperature, humidity and illuminance. More importantly, it includes a XBee wireless connectivity module that allows it to connect to a IoT bridge.
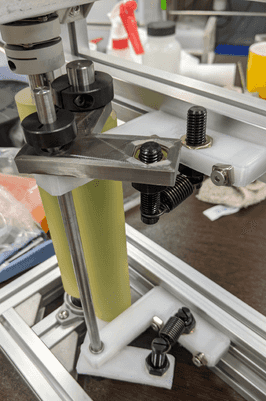
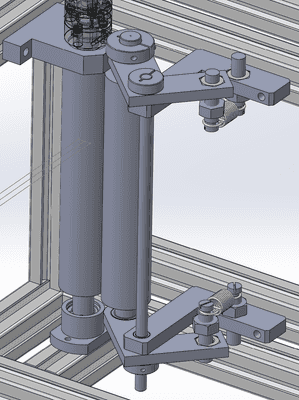
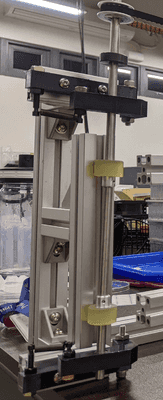
Spring-loaded roller
The spring-loaded roller is an essential part of the modified design. These photos shows that the two sets of rollers driving the adhesive paper are spring-loaded to maintain the normal force between them.
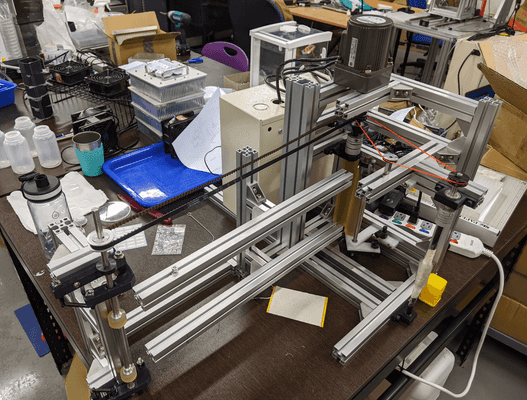
Single power source
Another highlight is how all three rotating part is motorized by a single motor with two belts.
Improving the workflow
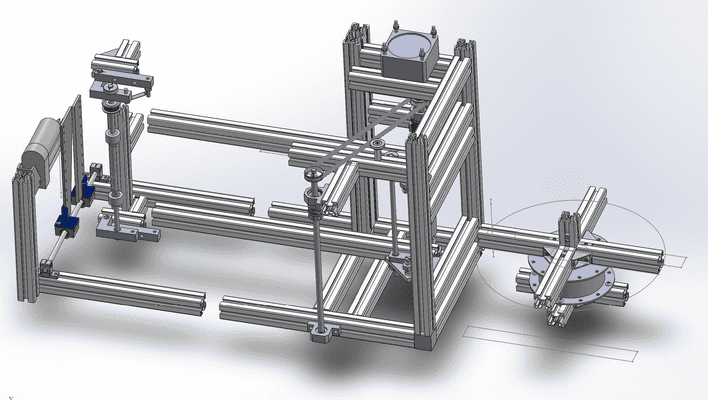
Git-based CAD collaboration
The extensive CAD work was shared by me and a collegue. I created a git-based collaboration workflow that allow us to work on different part of the model while complying to the specified dimension at the same time.

Bill of Materials managment
In order to track the large number of components used in this machine, I created a Notion-based Bill of Materials (BOM) managment database so I can track quotes from vendors as well as changes in the design.
Learn more
PageMate
A smart bookmark that bridges physical and digital books.

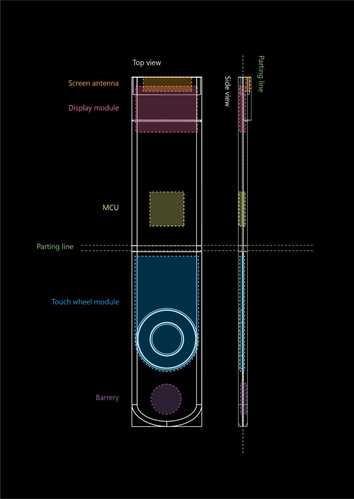
The PageMate smart bookmark syncs your reading progress between physical book and ebook. It's a slim and phone-connected bookmark that has a screen showing your latest reading progress on your connected ebook service. It also has a intuitive touch-sensitive scrollwheel that allows you to quickly update your ebook with your progress on the physical copy. PageMate allows users to go from reading a physical book at home to reading the digital version during their commute without frustration or time delay.
Prototype engineering

Cloud service
The cloud service was developed as a simple node.js app using the Express framework. It has a couple of POST and GET request interface for PageMate and ebook service. We hosted the service on Render.
Hardware
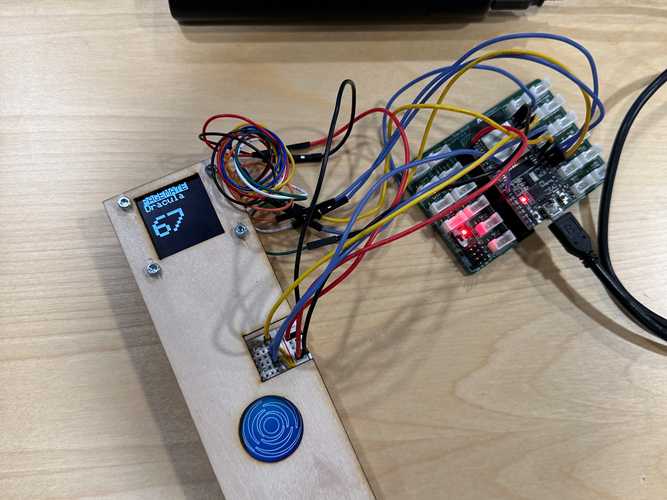
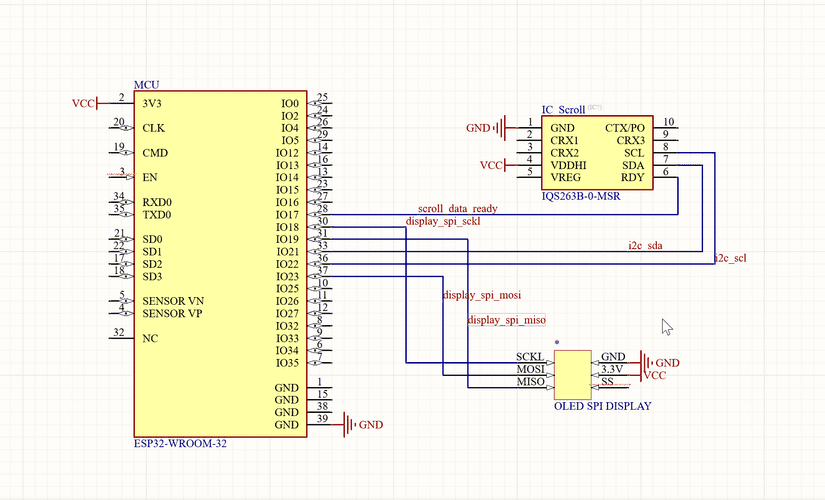
The prototype uses an ESP32 as the main processor. The capacitive touch-sensitive scroll wheel is a small touchpad with integrated controller IC. It communicates with the processor with I2C protocol. After reading the input value from the touchpad, the processor sends a POST request to our cloud service.
User experience
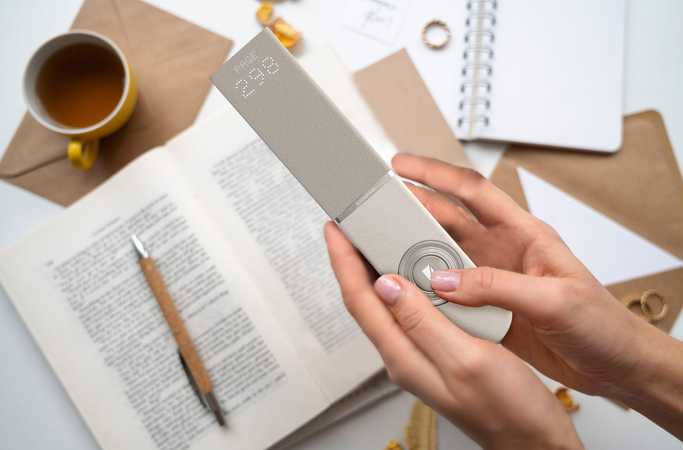
You are reading a book both with physical copy at home and ebook copy on the go.
- In the morning commute, you turn on the ereader and the ebook automatically updates to where you left off on the physical book last night before you went to bed.
- After you get back home, the PageMate bookmark in your physical book displays the page number of your progress on the ebook during commuting.
- After you finishing reading the physical book in the night, use the scrollwheel on the PageMate bookmark to enter your latest progress.
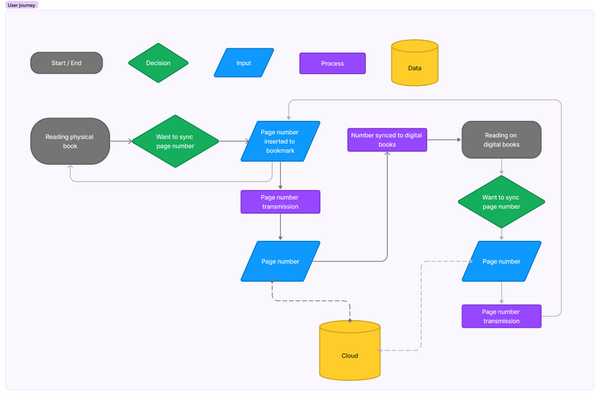
A study by Bailey, Sahoo, and Jones (2020) conducted a format-switching experiment to examine how readers switch between different formats of the same book. They surveyed 100 participants and found that 50 of them owned at least one book in more than one format, with 48 of those owning a book in physical and ebook form. Of the 50-person subset, 26 would switch between formats of the same book, while the remaining 24 would not due to there not being an easy way to switch quickly. The readers who switched between formats would use strategies such as remembering plot points, ending at a chapter change, or placing the books side by side to compare. However, these strategies were frustrating and the average time to switch between an ebook and a physical book was over a minute.

The PageMate companion app allows you to connect to your ebook service, choose which book your bookmark should track and monitor the battery status of your PageMate.
Design iterations

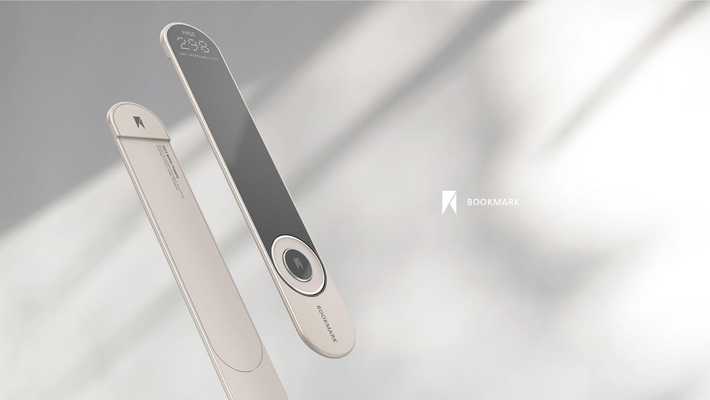
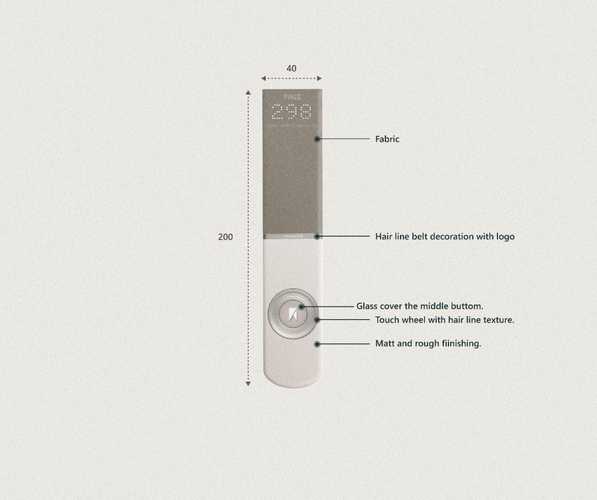
Our prior iterations include one that uses a elasticated loop to fix PageMate on the cover of the book. This means it will be easier to carry it around . However, on our user testings, our target users found this design has more possibility to cause damages on the book. They also keep their physical copy at home for the most time. So we switched to this simpler design which PageMate is placed in between pages.
The choice of using a touch-sensitive scroll wheel is also the result of user testing. We had a numpad and an two-button increment/decrement option, but users found the scroll wheel to be the easiest one to use when they need to increase many numbers quickly.
Credits
I designed and implemented both the hardware and the cloud service for the prototype. I collaborated with Rinoj Raj Nakarmi on connecting his ebook mock-up to our cloud sevice. He also designed the app prototype. I collaborated with Chin-Ying Chu on several iterations of CAD models of PageMate. She created the rendering images.
TeleSHift
Telexisting shape-shifting 3D tangible user interface for physical collaboration and interaction.

TeleSHift is shape-transforming device that can be physically joined to form almost any object. It also has a Telexisting communication framework that enable people to collaborate on 3D shapes remotely and simoutaneously, and allows two separated objects formed by TeleSHift in different physical spaces to sense co-presence via interaction. With the Tangile User Interface (TUI) presented by TeleSHift, 3D concepts can be presented and edited on true 3D interface.
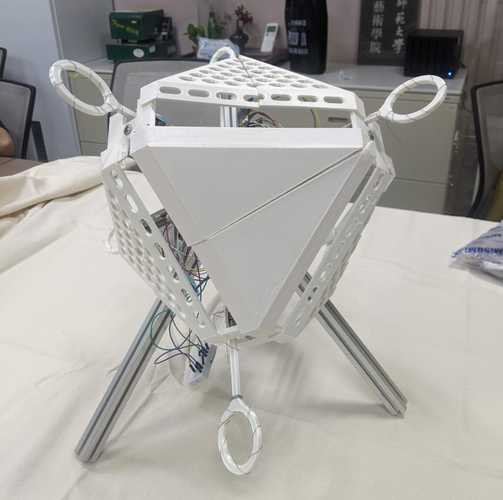
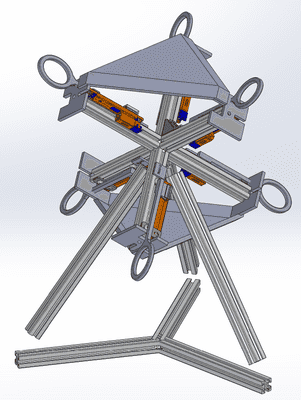
In order to showcase the TUI concept, we developed this larger-scale prototype. Each prototype has six arms made of motorized potentiometer which has the functionalities of detecting its position and moving to a spcified position, enabling the shape-transforming capability of TeleSHift. Each TeleSHift prototype use a single ESP32 as its MCU, allowing network-connection and the Telexisting communication framework.
Three modes of Telexisting communication
In this interactive widget, try move the sliders on both TeleSHifts in all three modes.
Each arm of slave TeleSHift is programmed to follow the position of master TeleSHift, but not vice versa.
Use case: Dimensional teaching.
Each arm of both TeleSHifts is synced with the respective arm on the other TeleSHift.
Use case: 3D structure co-editing for remote prototyping collaboration.
TeleSHift can be commanded to restore a pre-defined shape in its memory.
Use case: As a prototyping material to reduce material waste.
How I built TeleSHift
Design considerations
Hover on the images to learn more.
An extensive and detailed design was done in SolidWorks, including analysis of mechanical interference. A wide range of custom-designed components was used to ensure its structural stability and to achieve this unique hexahedron shape. Despite this prototype is just a proof-of-concept, there are lots of consideration in its appearance.

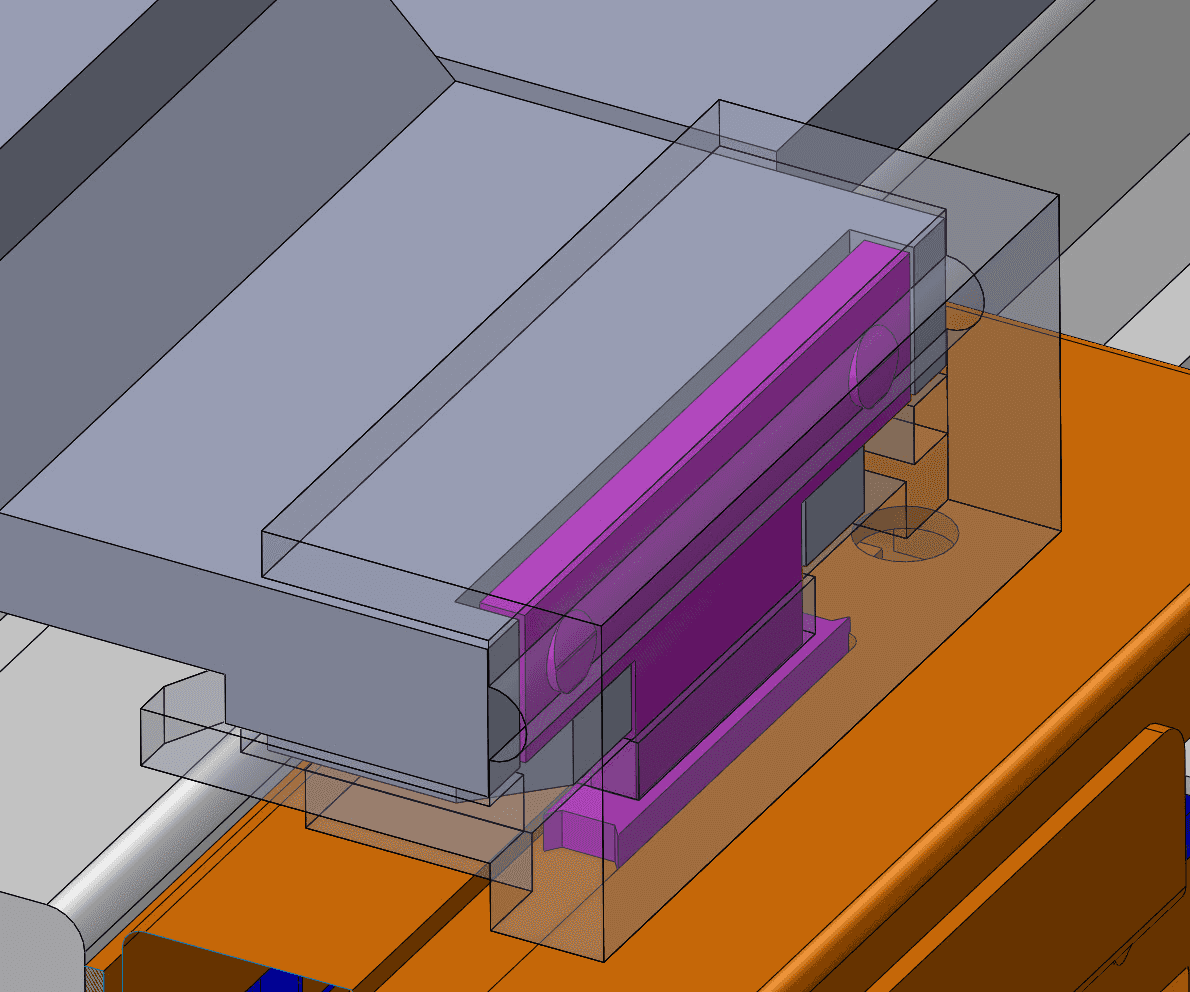
This small component that anchors the extension rod on the motorized slide potentiometer is surprisingly the most difficult one to design.
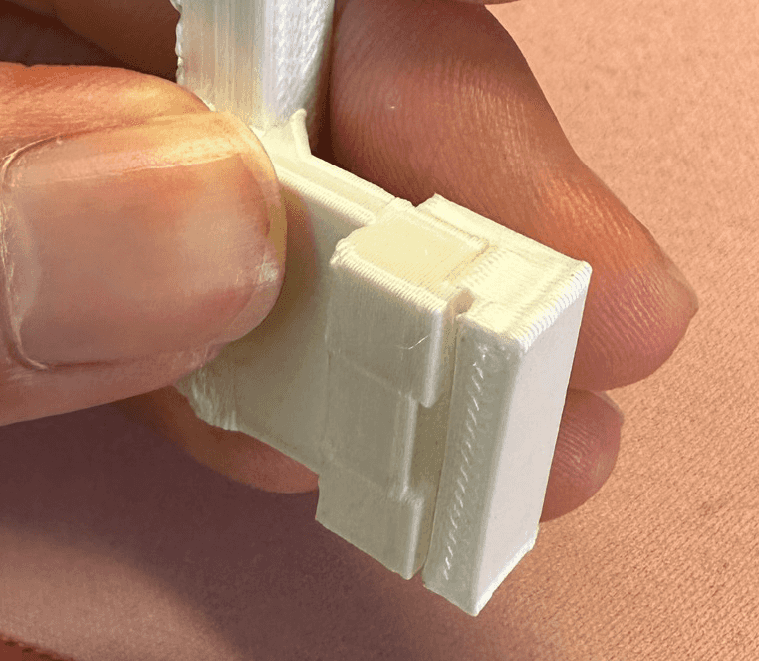
The original design requires adhesive to assemble, is very unstable and lacks pass-through for touch sensitivity wire.
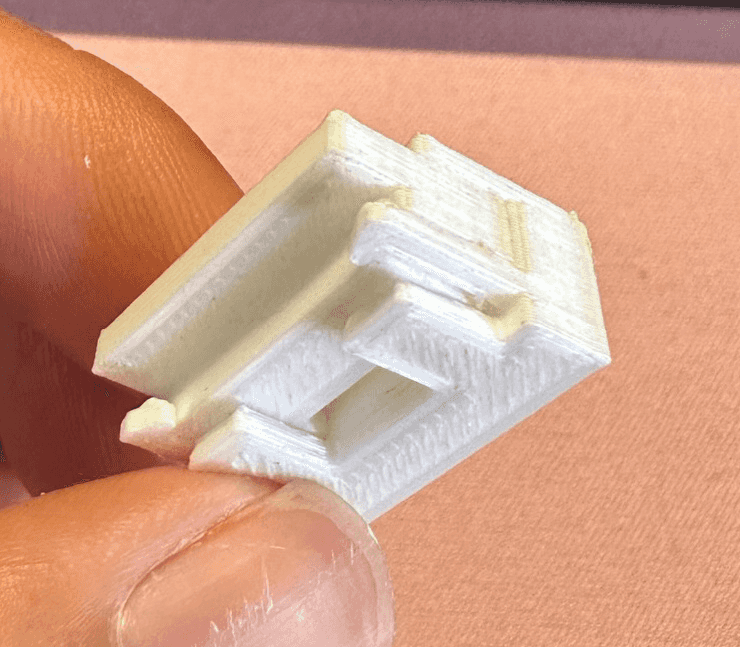
I tried six prototypes to arrive at this improved "snap" that only takes 3 seconds to assemble and is much more stable.
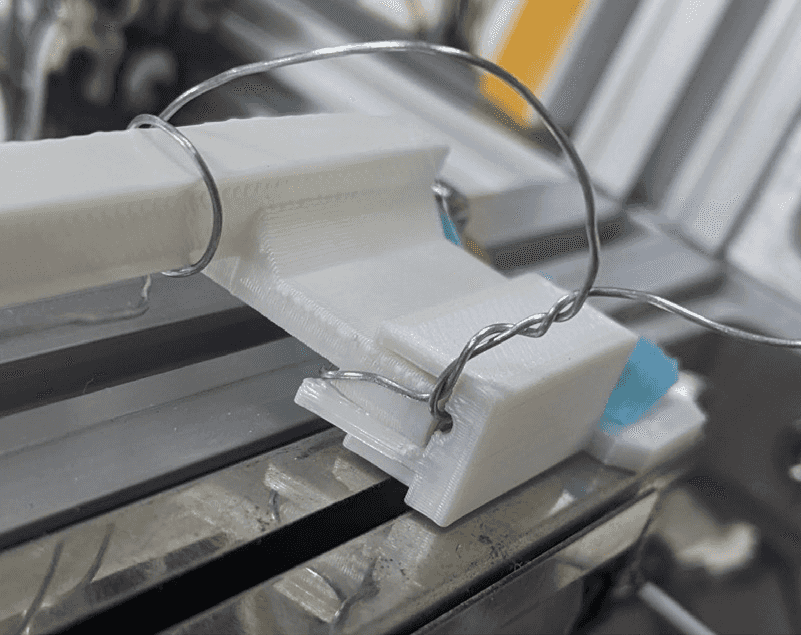
The finalized version adds pass-through for touch sensitivity wire and takes 20% less time to be 3D printed by improving the shape.
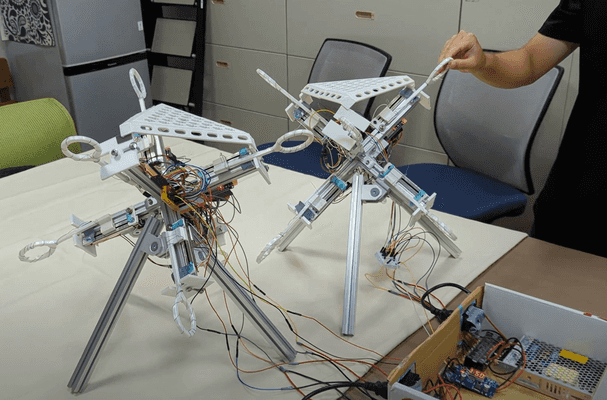
In addition to the appearance and mechanical design, I also designed its power supply circuit and laid out the control system architecture.
Learn more
HSI Imaging System
A novel line-scan HyperSpectral Imaging system for scientific uses.

Hyperspectral imaging, or spectral mapping, is an imaging process that measures the whole spectrum on each location of a sample. The scanning process of traditional microscopic spectral mapping is complex and the scanning range is often small. I developed this system and its accompanying software to enable researchers in the field of optoelectronics to work more efficiently by improving scanning speed and range and providing self-contained data analysis features.
Visual communications
The complex concepts involved in this novel spectral imaging system is not easy to understand even for people in the field. That is why I devoted a lot of effort into the visual communication of this product and made the following graphs.
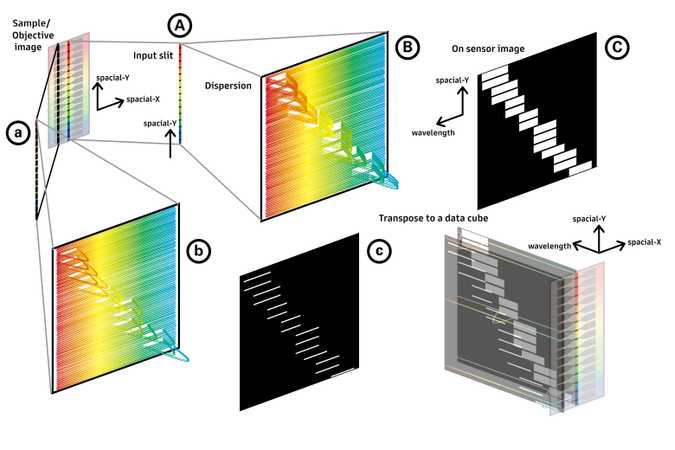
From scanning to formation of data
From A to C:
- The system takes a photo of a line on the sample through the input slit.
- Every point on the line has its spectrum dispersed simoutaneously by a linear spectrometer.
- These spectra is imaged on a 2D monochrome EMCCD sensor to form the "on sensor image".
From ABC to abc: the same procedure is repeated on other lines on the sample to acquire the spectra on every location of the sample. The movement is achieved by a motorized stage.

Ray trace and system configuration
Based on my observations when working alongside researchers in the field, I found that once they fully understand the optical components of HSI, they will also be able to comprehend the working principle of HSI at the same time. Instead of trying to explain the complicated working principle everytime, I found that simply explaining only the system configuration is much easier and more effective.
Human-centered approach
In order to find the needs and bottleneck of current spectral mapping workflow, I worked with professional researchers in the institute for a couple of monthes before the development of HSI.
I identified the following painpoints and developed features accordingly.Painpoints
1
Jumping between equipments
2
Jumping between softwares
3
Lack of suitable file format
HSI
An one-stop, integrated solution
A big bottleneck in the workflow of spectral mapping is the need to decide the range of scanning by examining the sample on another equipment beforehand. That is why I integrated another Optical Microscope (OM) in HSI hardware so users can set and iterate scanning ranges in the same HSI software without moving the sample to another OM.
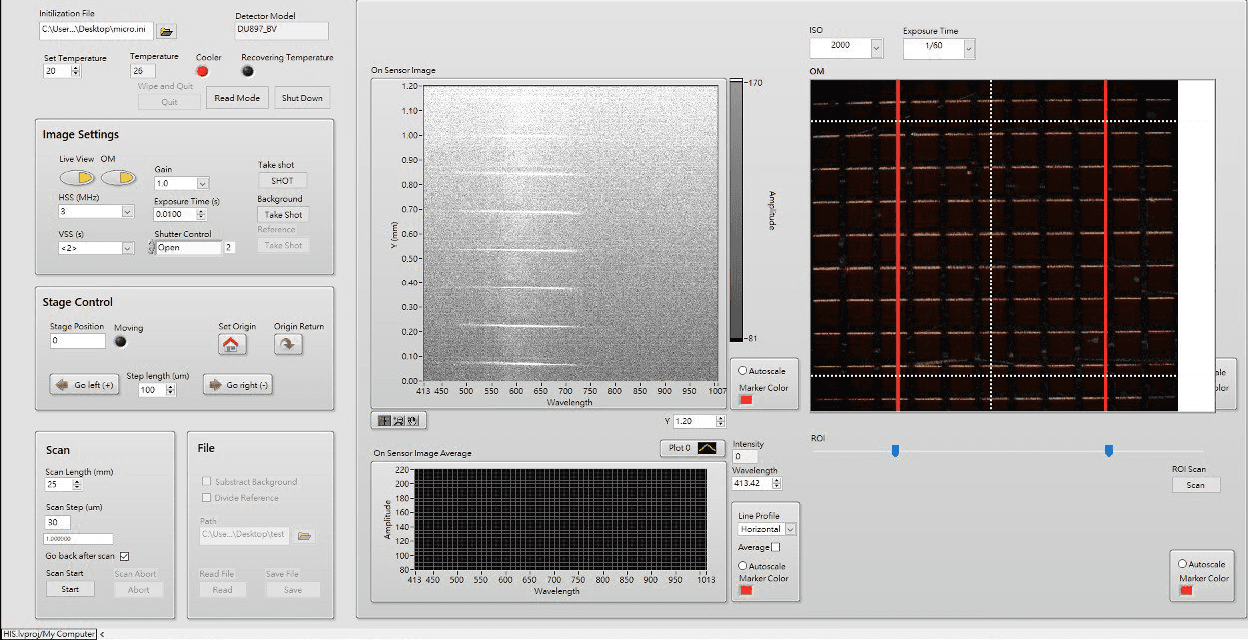
Due to the special 3D array data structure of hyperspectral imaging, another issue in spectral mapping workflow is the need to use special software to view and perform analysis on the image. So, I developed analysis features in the HSI software that allows users to browse the three dimensional image from different "perspectives" (2D slices), which is not a feature availiable on existing softwares like ImageJ. Also, analysis features for specific workflow like backgroud subtraction for reflective spectrum are also built-in, so users no longer have to switch between different softwares.
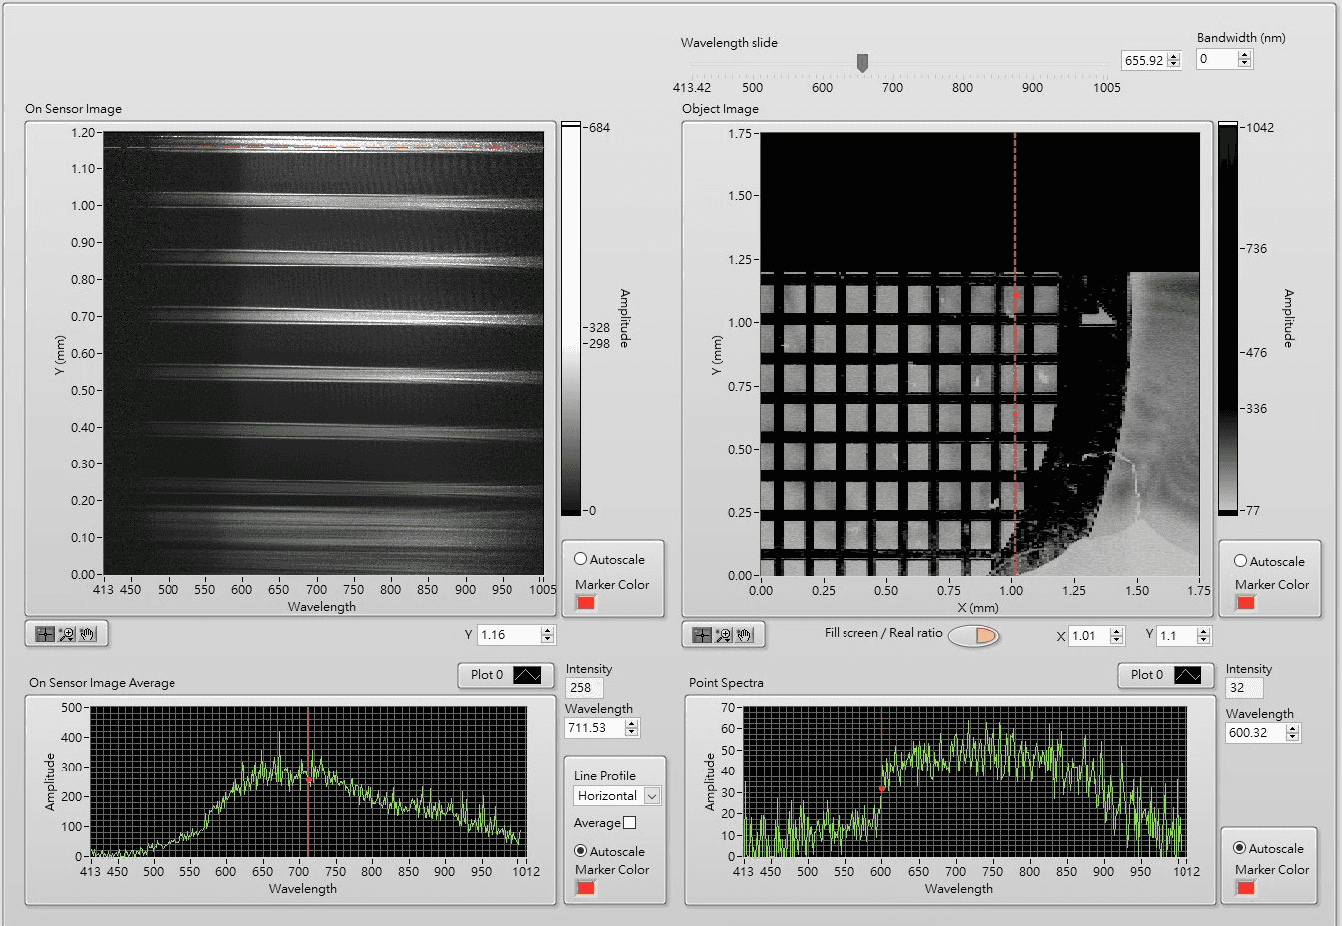
While there are existing file formats that are able to store hyperspectral images, their compatibilities are often limited and can not store important scanning settings. I developed a custom TIFF file format that is compatible with existing softwares but also carries information unique to HSI to address the issue.
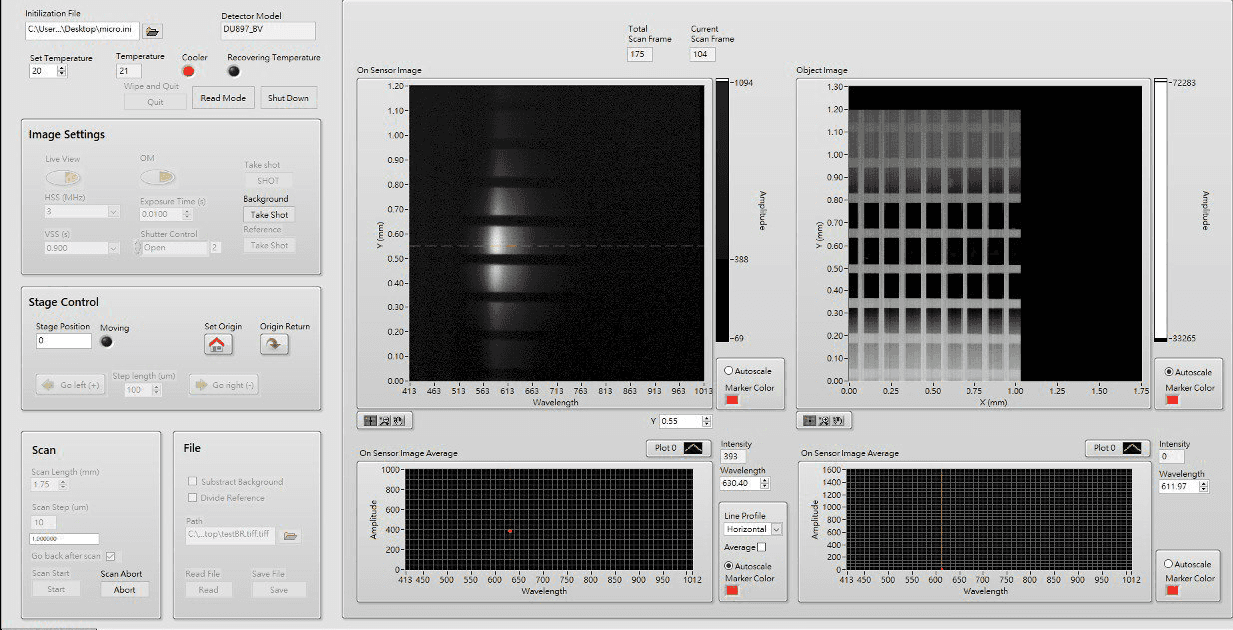
Learn more
Also checkout:
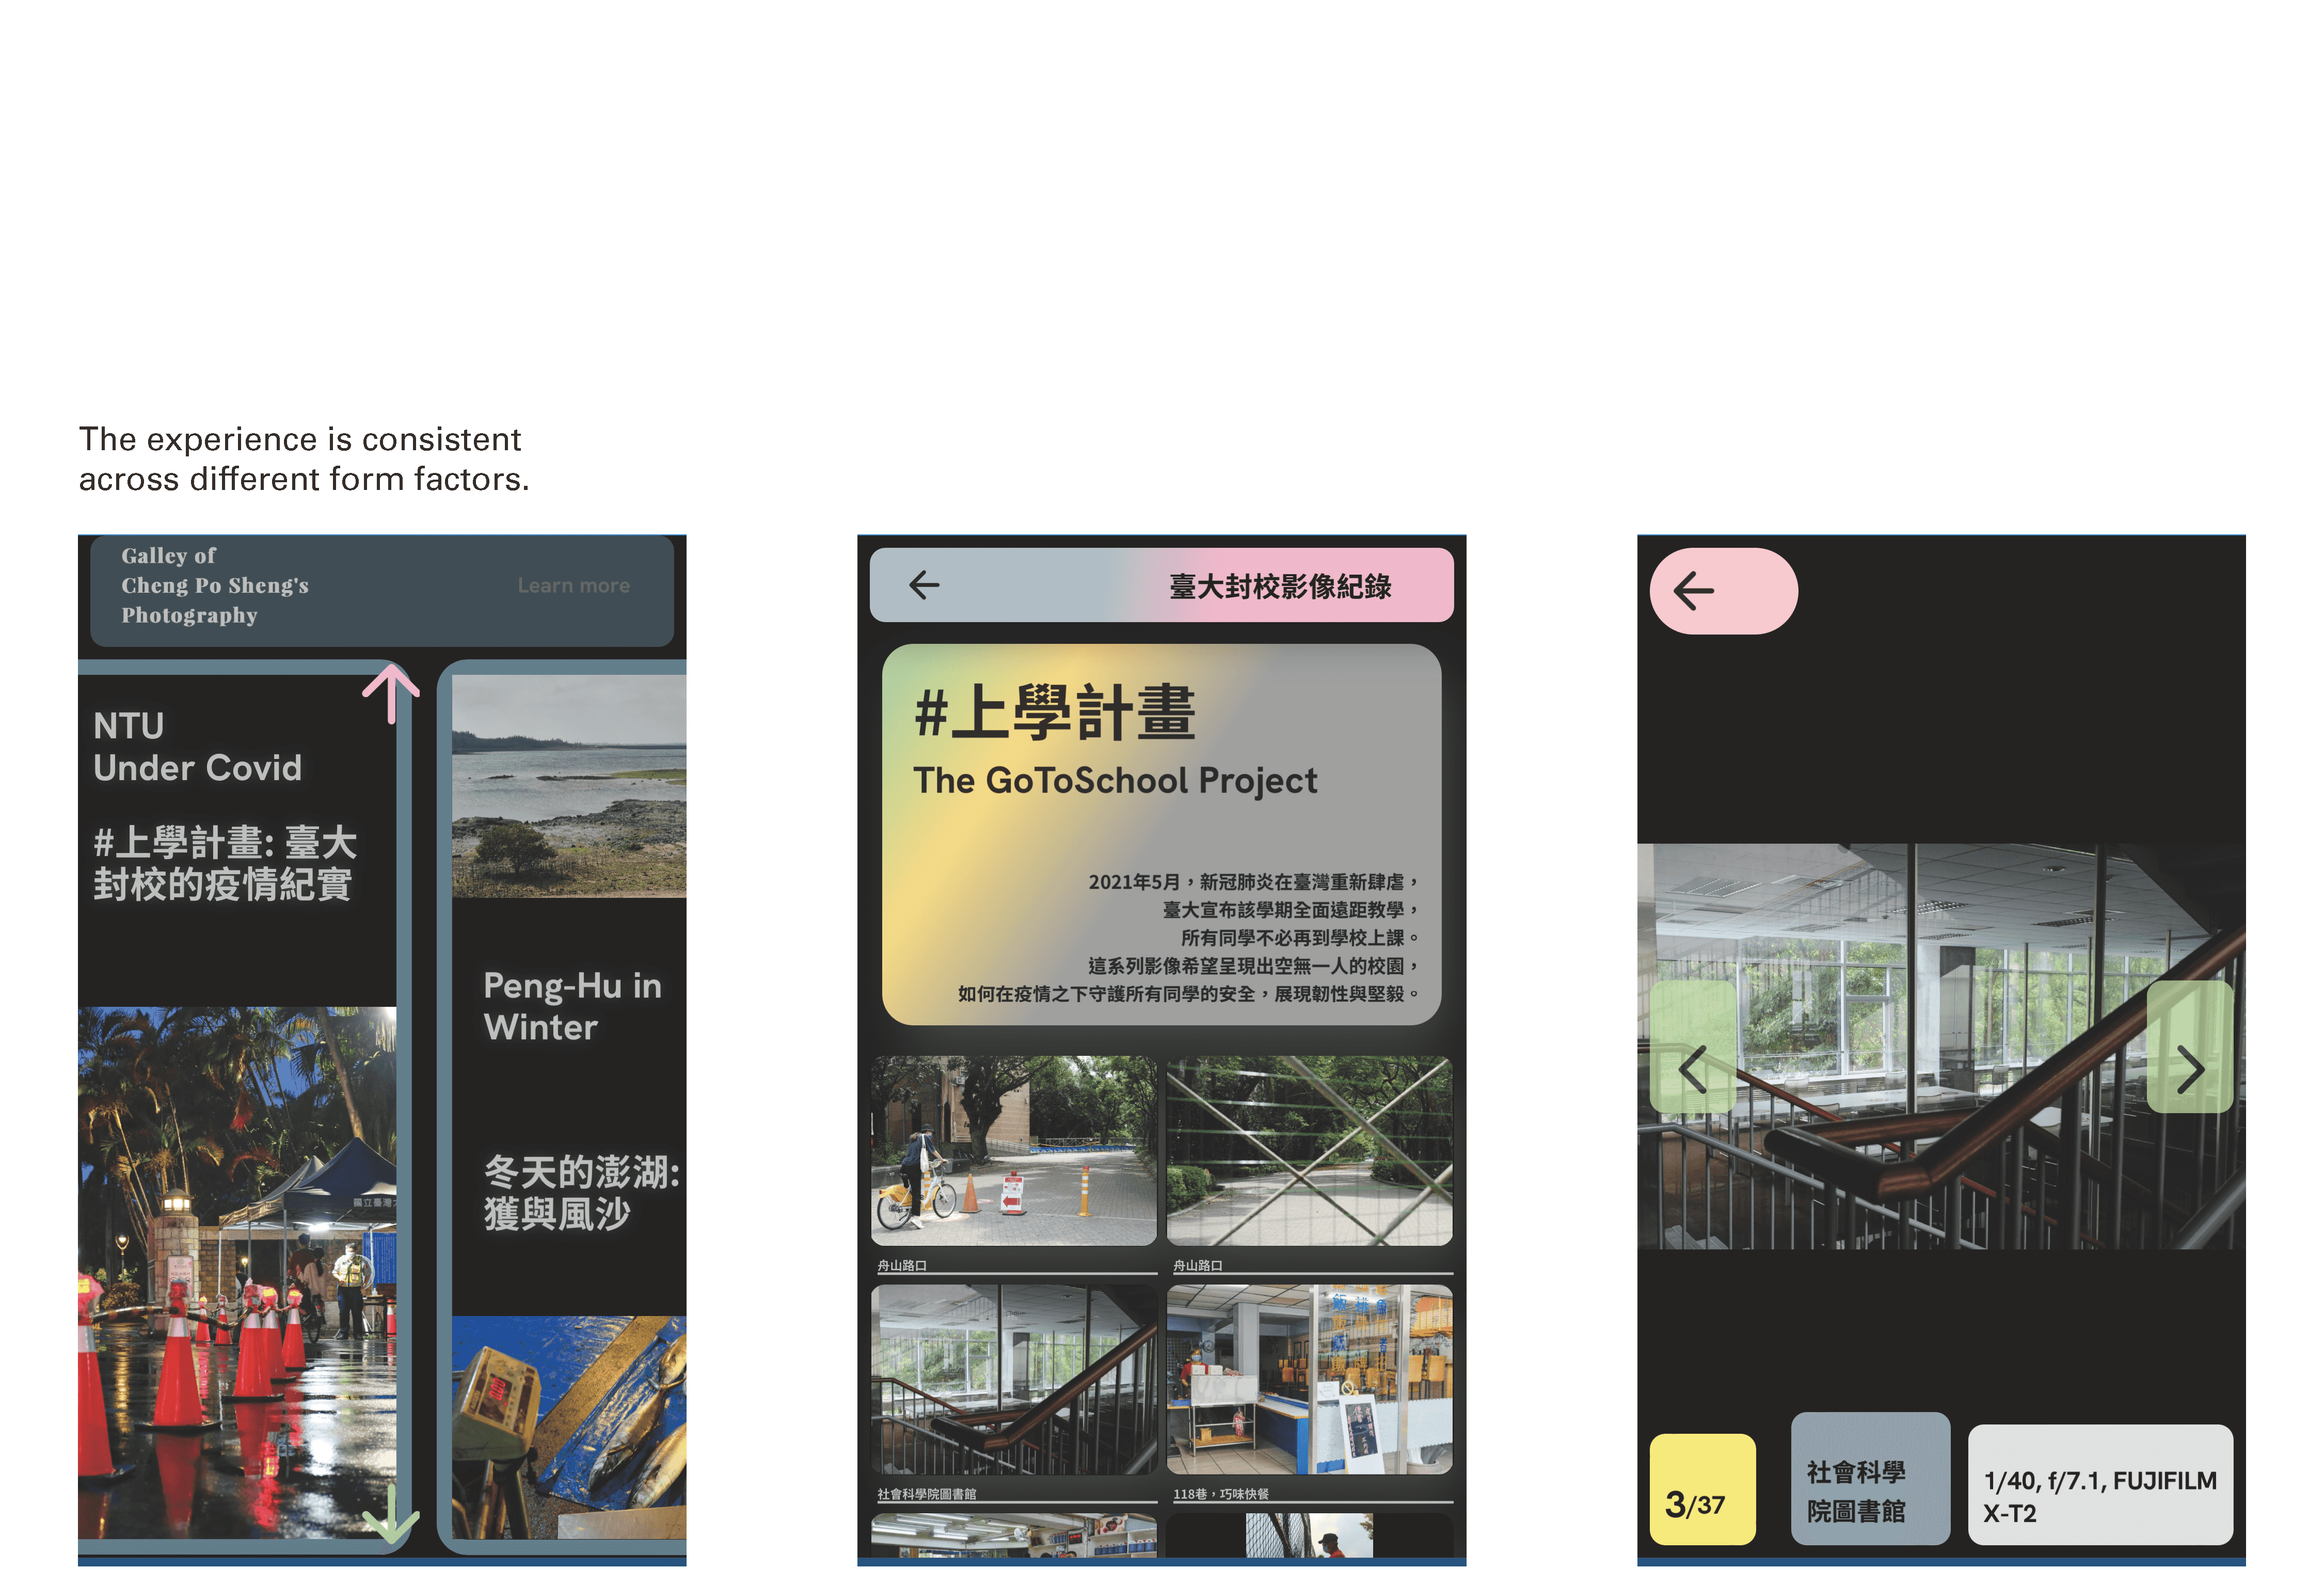
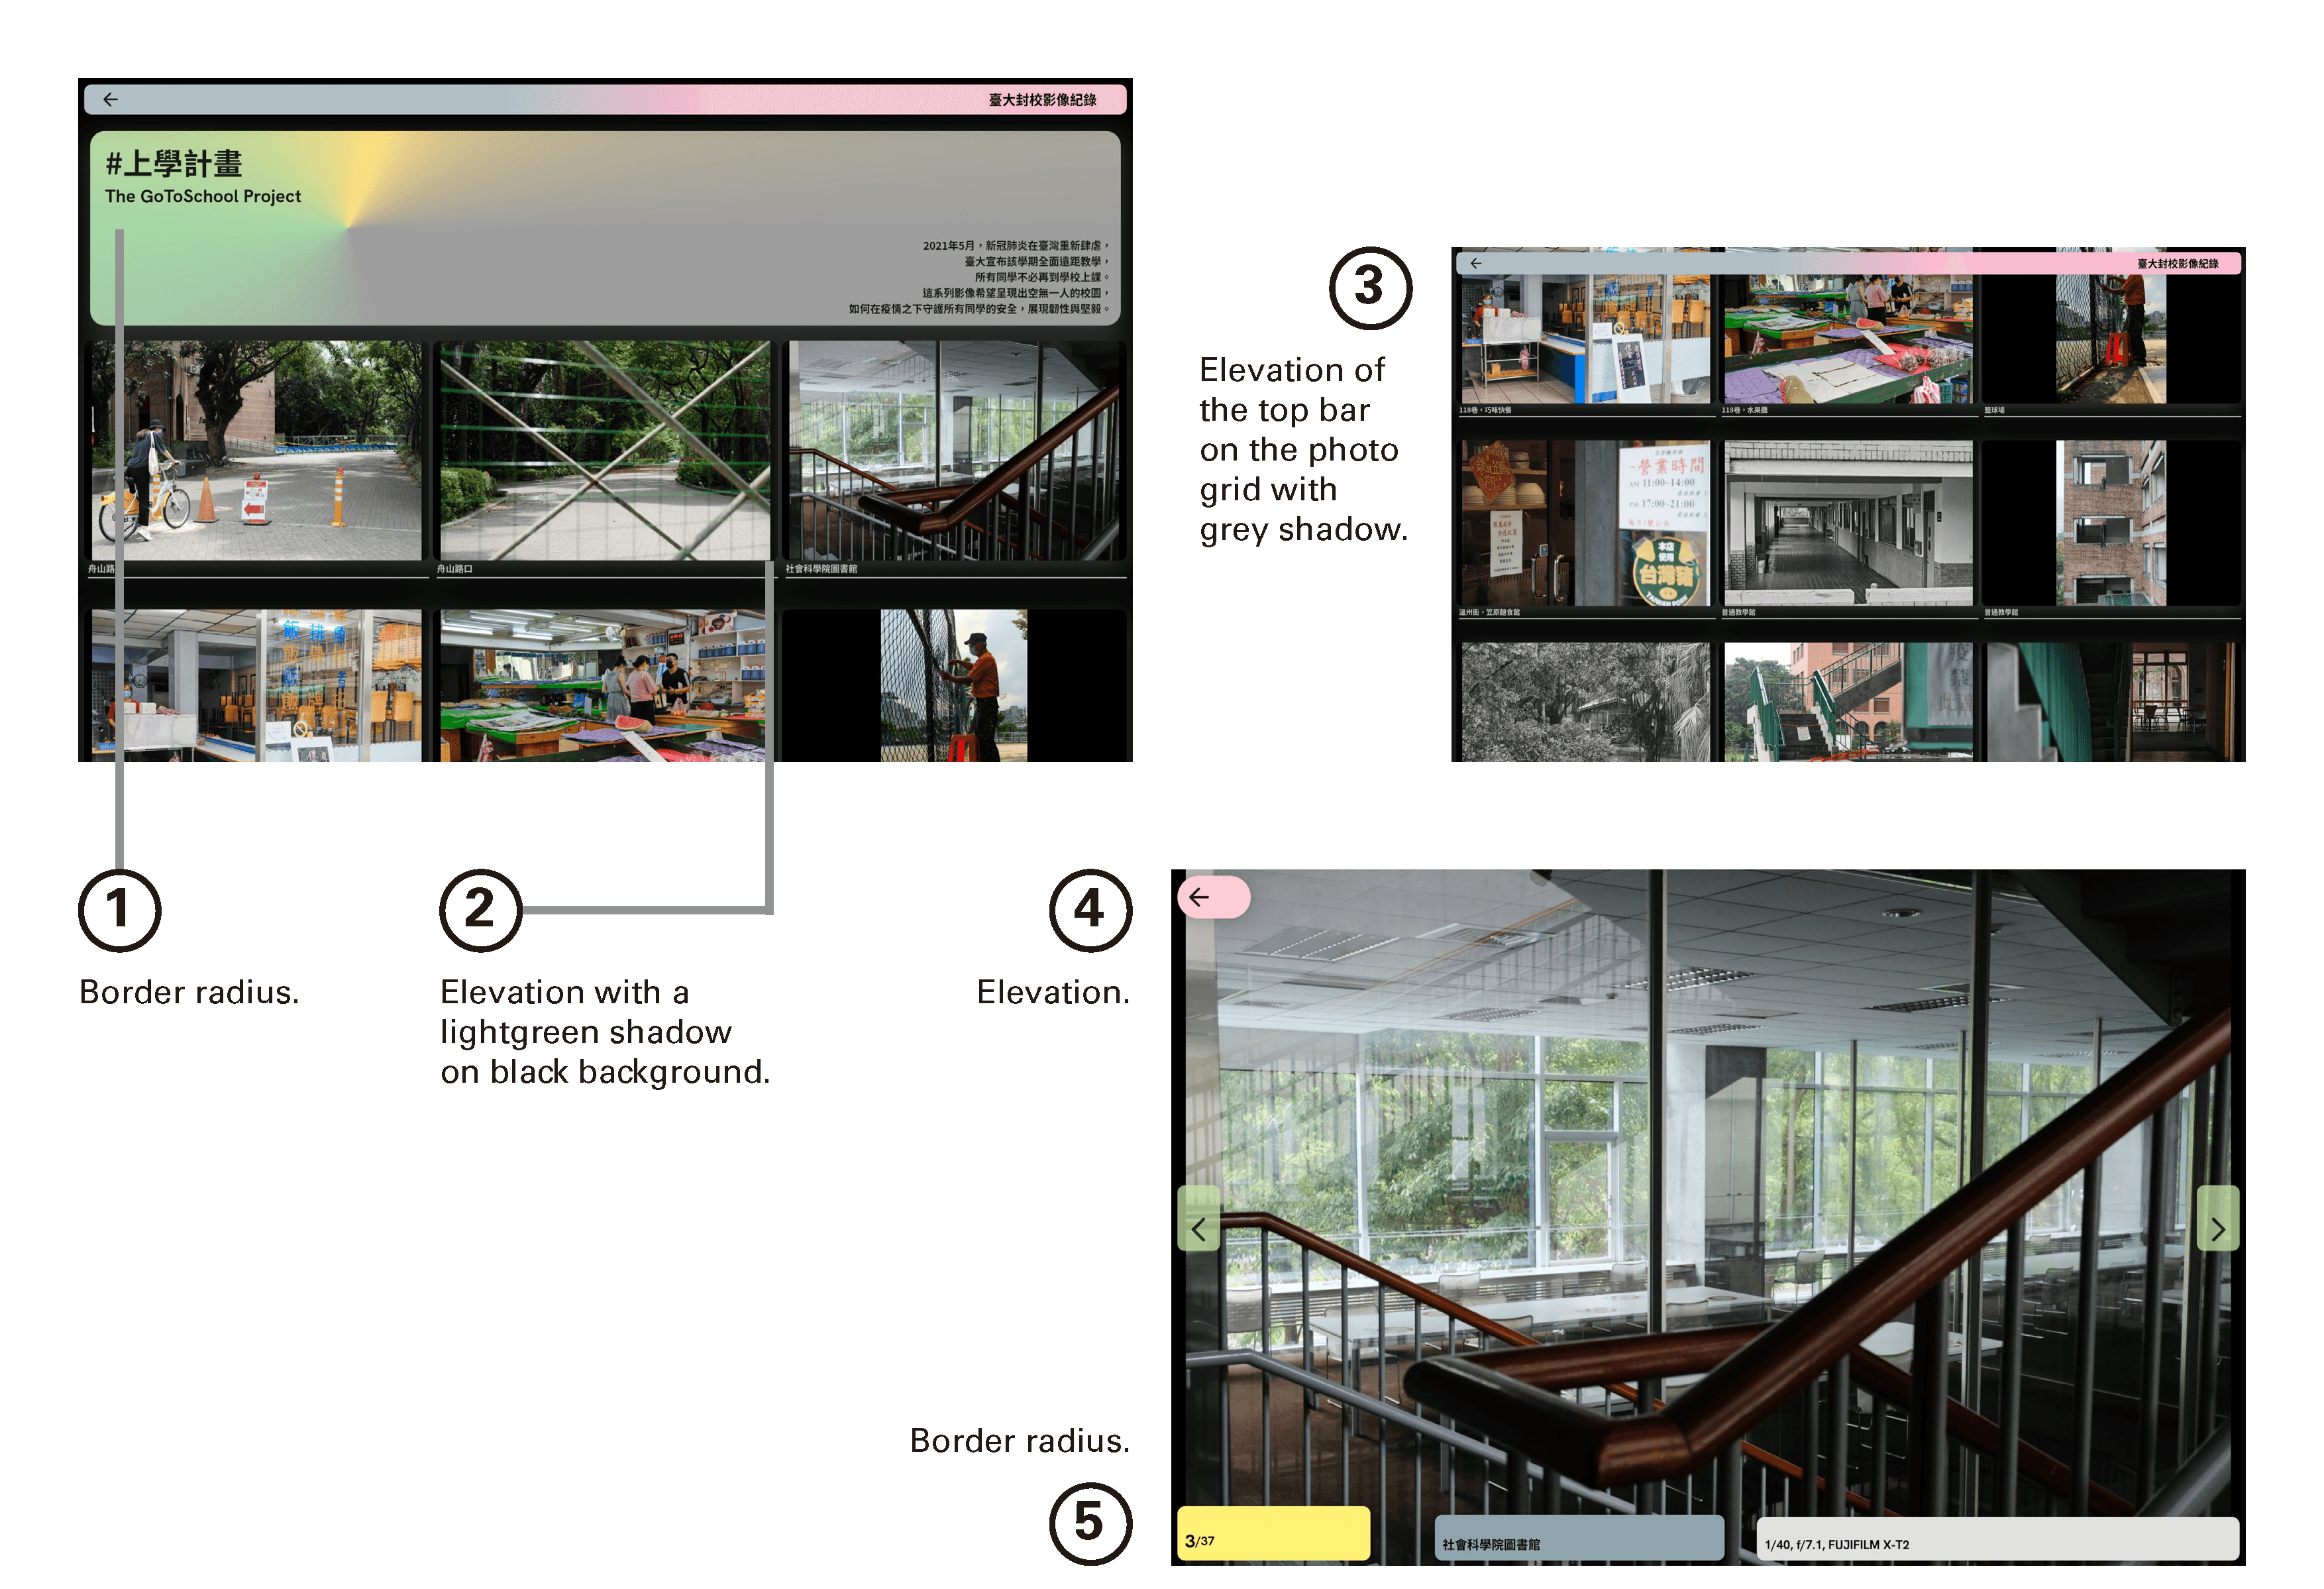
My Online Photographic Gallery
Interface design & development
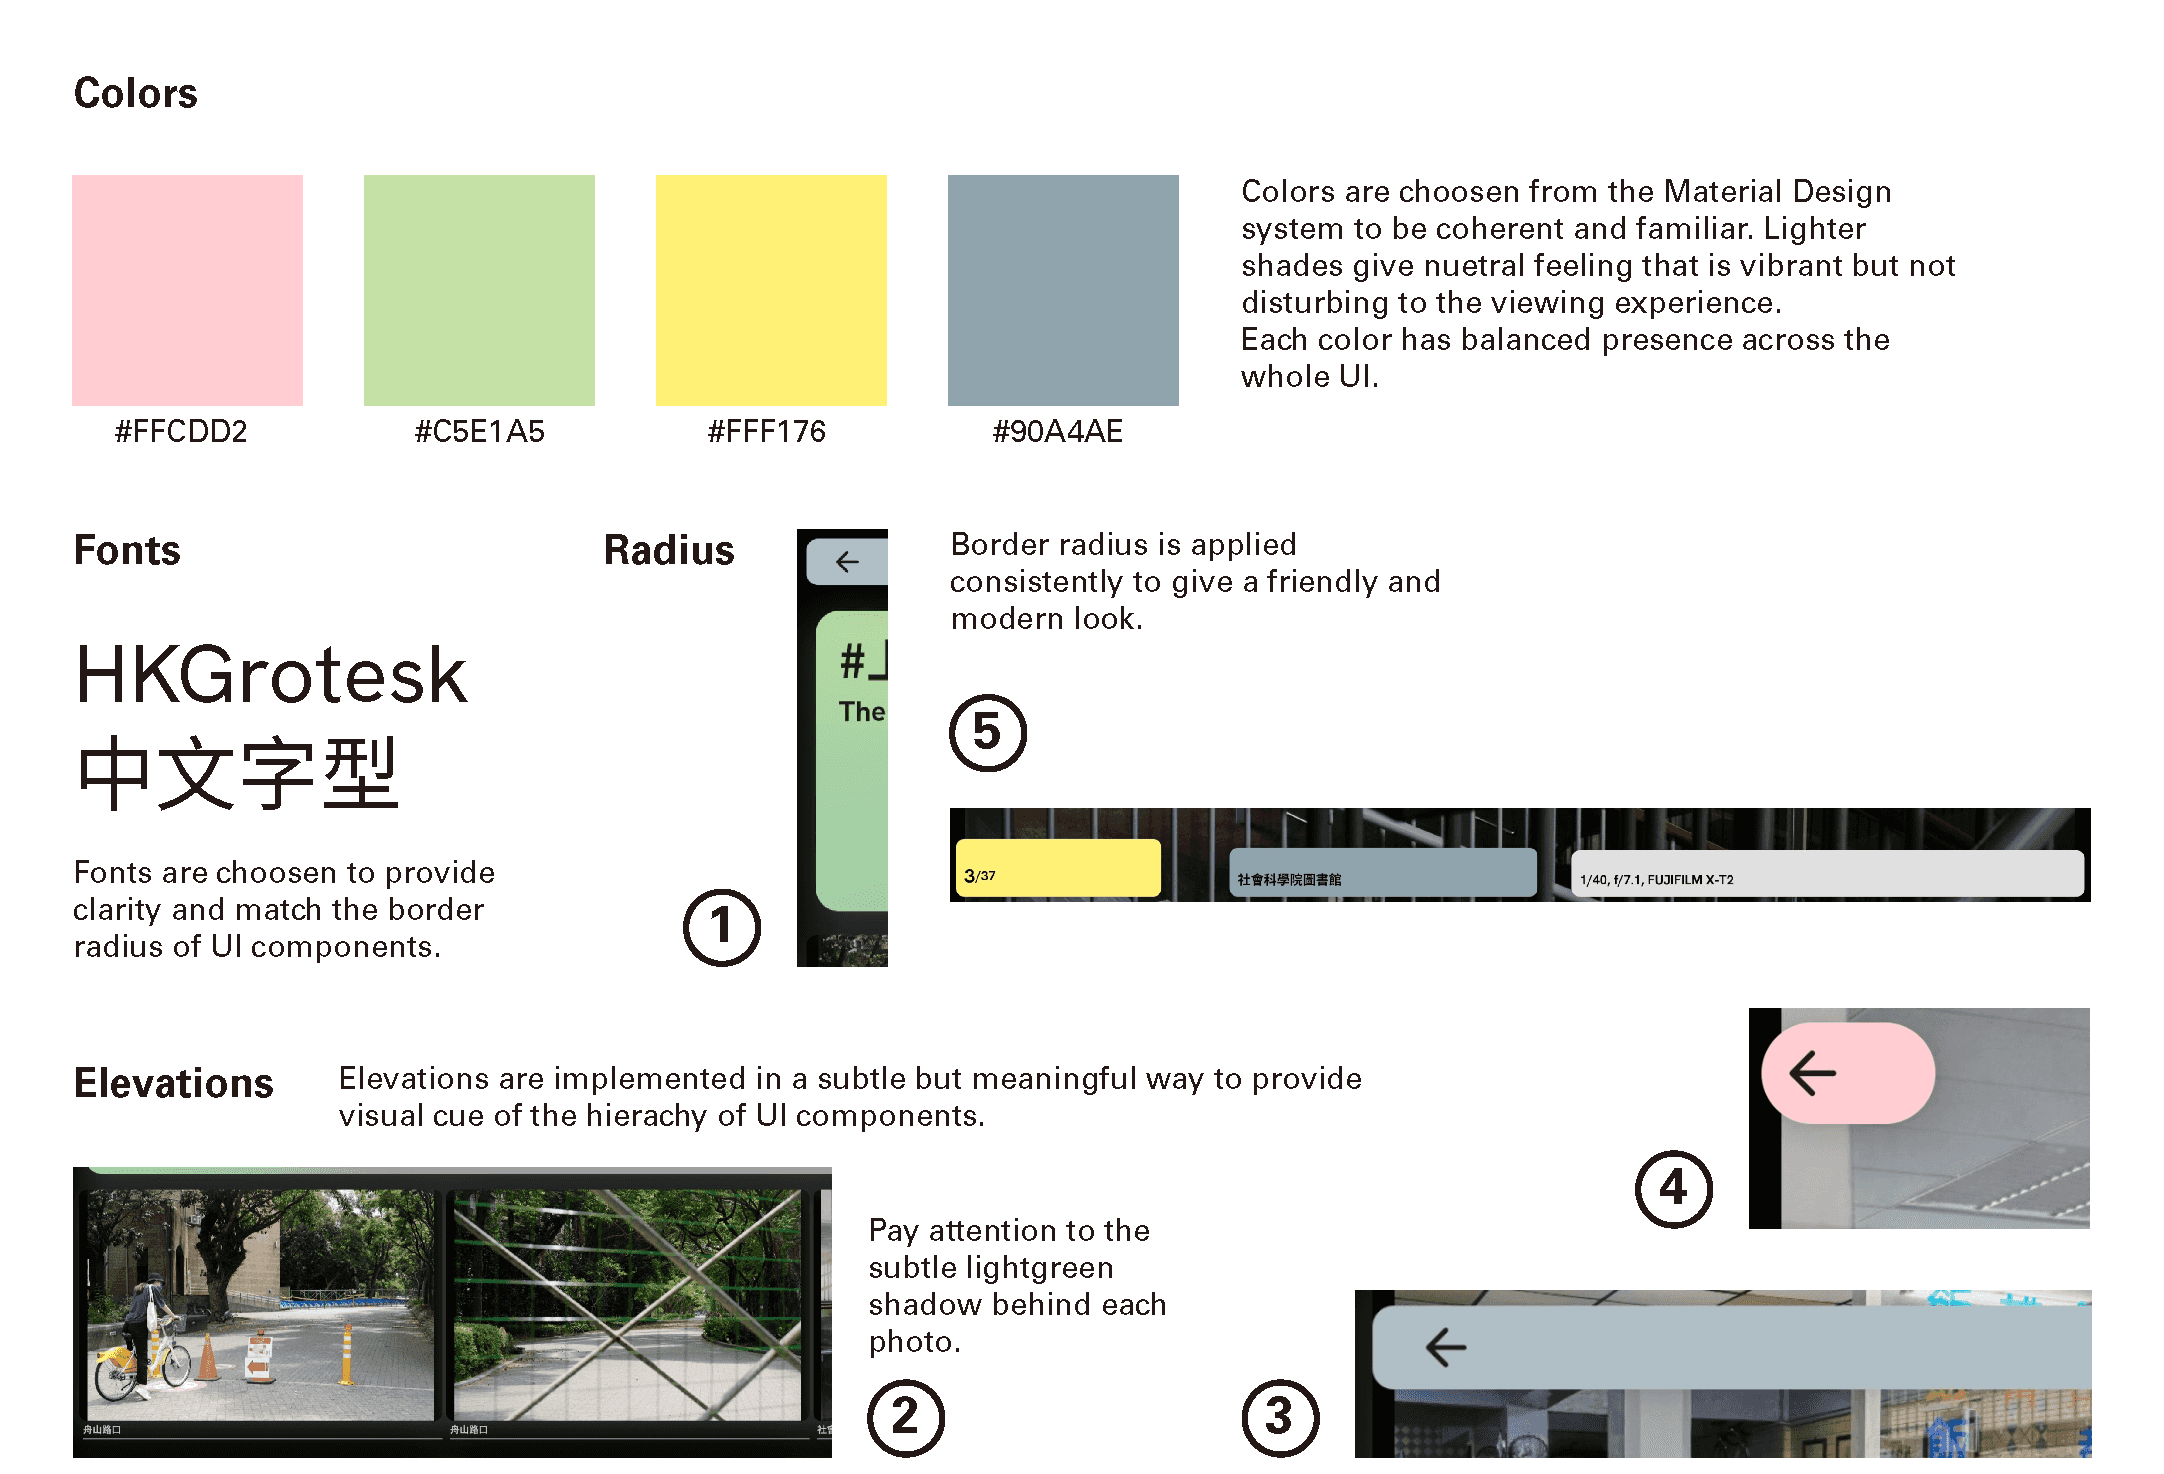
The whole digital experience is designed & built by myself as a modern, friendly, intuitive and visually neutral image gallery. Click the above link to experience it.

